Elizabetty
Member
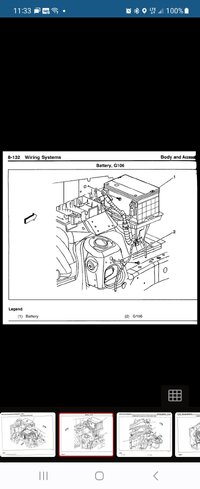
Hello. The ground that I believe to be g106 is highly corroded and I believe when going to fix this, I am not going to be able to find a clean surface to attach to. The entire area is very rusty. I was informed that where it looks like there is a crimp or connection of two cables where the corrosion is at the bolt, it runs after g106 to the block. I suppose it's possible under all of the green corrosion there aren't two wires crimped and it simply one wire bolted here and then continues on, but I was giving the impression there is a connection from battery to g106 and then a second connection that runs to the block.
When I attempt to fix this, if I am correct and I'm not able to get a rust free surface, what would be an alternative spot to ground to? I understand I can use various bolts already in existence, but it's my understanding I want the shortest path possible. Plus there's not much without thick rust to work with.
The plan I was given was to either run all new cable, or, splice in a section of cable that would be either soldered or crimped with heat shrink. Editing this to add that I think I could buy a new battery cable that would run directly from the terminal to my new ground and then hopefully have enough length to connect to where it needs to then run to the block. I don't understand why it was suggested I would splice in between g106 and the battery when it's just a short distance unless it's because of cost.
If I were to cut the cable between the battery and g106, I would need to then attach to the chassis or frame and of course then make sure I have cable connected from that spot and spliced into the one coming off the block.
I am unsure how to determine what gauge battery cable I need and how to go about finding a good ground point in this area when everything seems very thickly covered in rust where the original g106 is. It is my understanding the ground at the block is fine but that midpoint g106 is a problem.
Attachments

Last edited:


