Where to look coolant gauge

Nashcat

Member
Oct 11, 2015
15
Middle TN
I've searched the forums for several days and can't find the info, so I'm asking for a little help. My 2008 TB, with I6 has been having this problem for several weeks, and I've narrowed it down, but don't know where to start looking. I thought I had 2 separate problems, but they are related. The first thing I noticed was the coolant gauge would occasionally stay at 100 degrees and sometimes the A/C compressor wouldn't come on. The CEL never came on during these malfunctions. At first, I didn't think they were related until I hooked up my very basic code scanner today. Like a dummy, I didn't write down the code number, but when I looked it up, it said that the engine wasn't getting up to temp, as quick as expected, and also that there was a communication problem, associated with that specific code. Anyway, with the engine running, I cleared the code and watched the coolant gauge jump from 100, up to 200 and stay at 200. When the gauge started working, the A/C compressor kicked on and started working. After about 10 miles, the gauge dropped back down to 100, but the compressor kept running. Based on my trouble shooting experience, I believe I have a bad connection from the sensor. The connector at the sensor is good, so I need to ask where the sensor lead goes next.

I'll try drive it enough tomorrow, to get it to throw the code again, so I can write it down. I'm new to this platform, so I guess I need to get a manual and a much better scanner. I'm pretty sure it's not a thermostat problem, since it heats to 200F, quickly. This is, on the days that the gauge works.

Thanks in advance,
John
 
The sensor itself is a known failure prone part and is replaced at the same time as the thermostat. Reason for this is that on earlier models, the sensor was just above the t-stat but yours was moved to the passenger side of the engine. It can still fail. It's not an expensive part so replace it and see if it is remedied.
 
Thanks for the help, guys. If the sensor is intermitant and throwing a code, would the gauge remain at 100F until the code was cleared? As soon as the code is cleared, the gauge starts working. I guess I'll go ahead and change thermostat and sensor (123,000 mi), but I hate throwing parts at something without knowing for sure. That probably comes from 35 years of troubleshooting industrial automation computers.

Nashcat
 
If you have to go after replacing the Coolant Sensor, having an Off-Set 18MM Special Socket can make life a bit easier. This is a comprehensive Master Sensor Socket Set covers the broad range of sensors on the vehicle. Of course, these “One and Done” tools all look way too expensive... until the time comes when you need them and its either 115 degrees in the shade or 40 below outside when you have to do the R&R and you would sell your soul just to have a little help to get the old sensor out and the Brand New One back in:

http://www.amazon.com/Alltrade-948005-Master-Sensor-Socket/dp/B005SMUORO/ref=pd_sim_sbs_263_2?ie=UTF8&dpID=41daLD2R0vL&dpSrc=sims&preST=_AC_UL160_SR160,160_&refRID=0AGMW2XP377WJXB87YWH


How to Replace The Coolant Sensor


By Justin Cupler

eHow Contributor

The TrailBlazer name originated as a trim level for the Blazer, in 1999. In 2002, the TrailBlazer became its own model, replacing all four-door Blazers, while two-door models kept the Blazer name. The 2005 TrailBlazer -- the last year before it replaced the Blazer altogether -- had a 4.2-liter six-cylinder engine as standard and 5.3-liter V-8 engine as an available option. Replacing the coolant temperature sensor on either engine is a similar process, with exception of the coolant refill procedure.

Things You'll Need
  • Floor jack

  • Jack stands

  • Drain pan

  • Slip-joint pliers

  • Ratchet
  • 6-inch extension

  • 12-point socket set

  • Thread sealer

  • Torque wrench

  • 3 to 4 gallons 50-50 premixed Dex-Cool coolant
  • Open the TrailBlazer's hood, and remove the radiator cap. Raise the front of the SUV, using a floor jack, and position jack stands under its frame rails. Lower the vehicle onto the jack stands.

  • Crawl beneath the vehicle and find the lower radiator hose. Place a drain pan under where the lower radiator hose connects to the radiator. Squeeze the ears on the lower hose-to-radiator hose clamp with slip-joint pliers, and slide the hose clamp about 6 inches toward the engine.

  • Pull the lower radiator hose from the radiator carefully, and allow all of the coolant to drain from the radiator and the lower radiator hose -- be prepared; the coolant will flow out of the hose and radiator quickly.

  • Press the lower hose back onto the radiator once all of the coolant has stopped draining into the pan. Use slip-joint pliers to move the hose clamp to about 1 inch from the end of the radiator hose.

  • Raise the TrailBlazer off the jack stands, using a floor jack, and remove the jack stands. Lower the SUV to the ground.

  • Find the coolant temperature sensor on the front of the engine block, just behind the alternator. Pull upward on the locking tab on the coolant temperature sensor's wiring harness, and pull the wiring harness from the sensor.

  • Loosen the sensor, using a ratchet, 6-inch extension and a 12-point socket. Remove the sensor the rest of the way by hand.

  • Apply a thin coat of thread sealer to the threads on the new coolant temperature sensor. Allow the sealer to cure for the time specified by its instructions.

  • Hand-tighten the new coolant temperature sensor into the engine and tighten it to 15 foot-pounds, using a torque wrench, 6-inch extension and 12-point socket. Plug the wiring harness into the receptacle on the new sensor.

  • Add 50-50 premixed Dex-Cool coolant into the radiator until it reaches the base of the radiator's filler neck. Open the coolant reservoir and add 50-50 premixed Dex-Cool coolant to it until the coolant level remains steady at the "Full Cold" mark on the reservoir.

  • Tighten the coolant reservoir cap and the radiator cap. Start the TrailBlazer's 4.2-liter engine and hold the engine's idle at 2,000 to 2,500 rpm until the temperature gauge reads about halfway. Allow it to idle for about three minutes, then shut the engine off. Allow the engine to cool until it is cold to the touch and check the coolant level in the coolant reservoir. Add 50-50 premixed coolant until the level reaches "Full Cold" on the reservoir.

    On the 5.3-liter V-8 engine, start the engine and hold at 3,000 rpm for 30 seconds, then allow the engine to idle for 30 seconds -- repeat this cycle until the temperature gauge reads about halfway. Allow the engine to idle for about three minutes, then shut the engine off. Allow the engine to set until it is cool to the touch and verify the coolant level is within the "Full Cold" range on the reservoir. Add more 50-50 premixed Dex-Cool coolant as needed.

    The regular-length TrailBlazer with a 4.2-liter engine has a 2.7-gallon coolant capacity, and the extended-length version has 3.45-gallon coolant capacity. The regular-length TrailBlazer with a 5.3-liter has a 3.05-gallon coolant capacity, and the extended-length has a 3.82-gallon capacity.

  • Take the old coolant to a used automotive fluid recycling center for disposal. Some auto parts stores take old coolant free of charge.
Tips & Warnings
  • Engine coolant is highly toxic, so keep it away from animals and children.
 
I would also replace the sensor ASAP. If the PCM thinks the engine is running cold, it will continuously dump extra fuel as if in open loop mode and this will effectively kill your Cat. The thermostat is a more involved job usually requiring removal of the fan/shroud and alternator. Some have been able to replace the t-stat by unbolting it from the wheelwell but I have never tried this myself. Replacing just the sensor will result in minimal coolant loss and should get your engine running properly. The code is probably the one for an engine running too cool.

Strange that the A/C won't kick on. It shouldn't matter if the engine is cold or not unless the sensor is shorted internally and making the PCM inhibit the A/C.
 
  • Like
Reactions: mrrsm
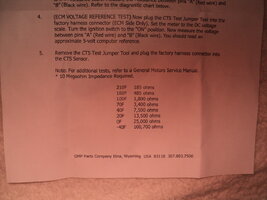
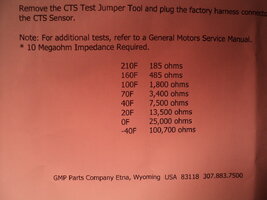
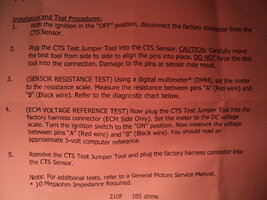
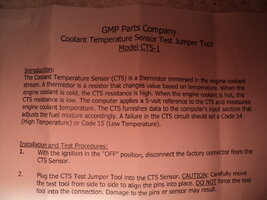
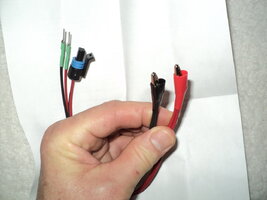
I am not certain if this unique Coolant Sensor Test Harness can be adapted for this kind of circumstance as I am uncertain whether there are substantial impedance differences between one...two...or three pin GM Temp Sensors... but just to find out if it might be useful for testing purposes beyond my 1993 Chevrolet Camaro Z28... Here goes...(See Attached Docs/Images)
 

Attachments

  • DSC04422.jpg
    DSC04422.jpg
    105.1 KB · Views: 6
  • DSC04423.jpg
    DSC04423.jpg
    94.6 KB · Views: 6
  • DSC04424.jpg
    DSC04424.jpg
    150.3 KB · Views: 5
  • DSC04425.jpg
    DSC04425.jpg
    132.3 KB · Views: 6
  • DSC04428.jpg
    DSC04428.jpg
    93.5 KB · Views: 7
  • DSC04433.jpg
    DSC04433.jpg
    78.4 KB · Views: 3
Last edited:
Here's an idea. Warm up the engine, shut it off, disconnect the sensor and put a 185 ohm resistor in the connector. Reset the codes and start the engine. If the gauge shows steady 210f, then it's confirmed the sensor is bad. According to the schematics, only the two wires are used, no ground.
 
I would also replace the sensor ASAP. ...

Strange that the A/C won't kick on. It shouldn't matter if the engine is cold or not unless the sensor is shorted internally and making the PCM inhibit the A/C.

You are correct Sir... The ECM/PCM will stop the A/C Compressor Unit dead in its tracks because it is defaulting to a worst case scenario of "Total Loss of Coolant" and adding to the suspected "hotness" of that would be instantly created by the A/C running R-134A through Condensing Coils adjacent to an already compromised Radiator, The "Freon Gas" gets HOT as soon as the gas starts circulating and compressing on its way through the condensing coils. This explains why at least one Radiator Fan generally turns on at the very instant the A/C is turned on in most vehicle applications. If this were allowed to happen while the Engine Coolant was boiling out of the system... it would just add another thermal insult to an already suspected developing thermal injury... and hasten the damage to the engine.
 
Last edited:
Well, I'm going to look for the specialty socket, or see if I have one to make it out of. Another quick question, for the thermostat and sensor, do you recommend OEM or aftermarket? If OEM, I'll have to wait until Tuesday to get it. (Monday's my birthday). I'm retired and have other rides, so I'm not desperate to get it fixed today.

I don't mind buying the speciality tools that are needed, because they usually save your rear end at some point in time. I carry a special flex + swivel ratchet on the Goldwing that turns the 5 hour alternator swap into about an hour.

I'll get back with everyone, after the repairs, to let you know how it goes. I hate reading threads where there is never a final answer, especially after reading 10 pages of posts. :biggrin:

Thanks again,
Nashcat
 
  • Like
Reactions: mrrsm
Perhaps the 18MM Box End Offset 12 Point Wrench from this Set will do the trick?... Around $16.00 for Whole Shebang at Harbor Freight... and if for some strange reason... it has a different MM size on the sensor barrel... the set will give you a wider range of possibilities:

http://www.harborfreight.com/8-piece-metric-offset-box-wrench-set-32042.html

You might also give your local Autozone a call and see if they will will sell you both the OEM Quality Sensor (AC-Delco via NAPA mostly) or Delphi...and the Specialty Tool...or perhaps they will allow you the use of a "Loaner" Tool.

EDIT:

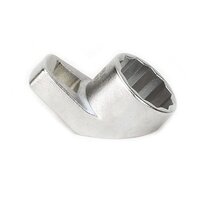
This scarce specialty too is made by Kent-Moore P/N J-34275 and is quite pricey at around $91.00 ... However... if you have an Ox-Acetylene Rig and 4.5" Angle Grinder with a Carborundum disc...you could cut off the 3/8" square insert from a seldom-used Crows Foot Tool and either Braze or Weld that short piece onto a shallow/short 18MM Parkerized 12 Point Impact Socket. Then, using an "Eye-Ball Gauge"... just grind in a "Slip-Over" Bevel like the one the image shows here... and that would probably do just as well:

http://www.etoolcart.com/nissan-coolant-temperature-sensor-socket-wrench-kent-moore-j-34275.aspx

And after that... if you wanted it to be fancy and rust-proofed as well ... I have done this myself and have carefully documented "How to Electro-Plate Tools and Rust-Prone Parts" in this way:

http://s557.photobucket.com/user/60dgrzbelow0/library/ELECTROPLATING?sort=3&page=1

...-=Happy Birthday, Brother=-...
 

Attachments

  • J34275.jpg
    J34275.jpg
    14.3 KB · Views: 3
Last edited:
Nothing but OEM/ACDelco on these. They can be picky on sensors and such.
 
  • Like
Reactions: mrrsm
I started looking for the OEM parts and found them at Amazon for a good price. With my Prime account, I get free 2 day shipping, so I'll let the mailman drop them off Tuesday or Wednesday. That gives me time to fabricate a sensor socket and figure out how to get these old bones far enough under the hood to reach that sensor at the rear of the block. I think I'll pull the left front wheel to replace the thermostat. Looks easy, compared to the sensor.

Nashcat
 
As a old shade tree, I replaced my 2003 I6
thermostat a few months ago. GM 12620112
1. Remove battery.
2. Remove engine lifting bracket.
Note: there is a hole in the block under the
alternator. Plug with a rag. If you drop the
hidden bolt on the bottom of the bracket,
you will find it laying down there when you
remove the alternator.
3. Remove alternator. No need to mess
with fan or shroud.
4. Replace thermostat.
5. Reassembly. Just a suggestion.
 
  • Like
Reactions: mrrsm
Well the problem is solved. The thermostat was causing the problems. I found that after driving about 5 miles, or so, the temperature gauge would stop working and drop to the 100 degree mark. Also, at the same time, the A/C compressor would quit running. When this would happen, there was no CEL, or other warning lights. It would however, throw a code of P0126, which is failure to reach expected temperature within expected time. With my scanner attached, while driving, I could reset the code and immediately the gauge would jump to 200 and the A/C compressor would start up. If I shut it off, and restarted while the engine was still warm, the problem usually wouldn't reoccur. I checked the wiring diagrams and found that the coolant sensor connects to the ECM, which controls the compressor, but couldn't find any reference for the strange gauge behavior.

Anyway, I managed to get the thermostat installed yesterday, and it seems to have solved all the problems with the gauge and compressor. I'll get the new sensor installed soon, just for the peace of mind. I had modified a 18mm socket for the sensor, but when the new sensor arrived, I found out that it's a 15mm. I haven't crawled over the back of the engine to see if my old sensor is 18mm or 15mm. I'm aching bad enough from crawling over and under the TB for 5 hours just to change the stat. That's ridiculous, putting a thermostat under the alternator, and then putting a hose directly in the way of the lower alternator bolt. If anyone reading this, is planning on replacing their thermostat, make sure you have a 15mm ratcheting box end for the lower alternator bolt. Without that wrench, you would have to cut down a open end to about 4" long and turn the bolt 1/6 of a turn at a time. Plus, it's threaded in about an inch!

Thanks, for everyone's advise,
Nashcat
 
Thanks for posting the fix bro! Should help others out in the very near future
 

Forum Statistics

Threads
24,340
Posts
649,477
Members
20,908
Latest member
Ndraco

Members Online